Friday, August 27, 2010

The Rebirth of Ruby Red

I'm extremely sentimental when it comes to my cars and I find it difficult refuse to let go of them......especially when it comes to my dear precious gem named Ruby. I've known Ruby longer than I've know Kim, which is why she understands my love for Ruby. I spent more time and money on this car than probably all my girlfriends combined. I've also risked my freedom and livelihood for this car (i.e. street racing pre-Fast & Furious Days). I even hung on the door of some punk's car while he drove off after my friends and I caught he breaking into my car. Lucky for me, I rolled safely to the floor when I swung from the car and the only remnant is a small scar on my knee.


We've been on quite a journey together. I bought the car in 1998, worked on it constantly for the next six years including two engine changes, three sets of wheels, two face lifts (ohhhh,Buddy Club), two sound systems, interior change, brake swaps, attempted shaved moldings, multiple Band-Aid paint jobs, and a few things I care not to mention.

We parted shortly when I reverted the car to stock and gave it to my cousin. He drove it around for a couple years, took good care of her, and graciously gave it back to me when he left for college in 2006 (Thanks Justin!). Reunited and it feels so good..

Fast forward to present day....


The car needed a paint job bad, and I couldn't justify spending a couple thousand for it. The quick, cheap Miracle and One Day paint jobs are atrocious. There seems to be no happy medium for this dilemma until.......... I read about the $75 Paint Job. There are threads upon threads that cover this topic. The results aren't perfect, but for what I was expecting it was more than enough. In case you're not familiar with the $75 Paint Job, it's basically a paint job using household Rust-O-Leum paint in a can and rolling it on the car with a small metal roller. ***Insert Laughter Here****

Did I say roll it on???????? YES, I DID!!! I was hysterical when I first read about this technique, but I was convinced after doing more research. Instead of rolling it on, which requires much more sanding, I decided to use 4" foam brushes after reading about the technique from another blog.

I started with some prep work, sanding the body down to make a smooth surface. With nothing more than Mineral Spirits, a few foam brushes, and a quart of oil based, Sunrise Red Rust-O-Leum from Home Depot, I painted my car like Daniel Son. I could hear Mr. Miyagi saying "UP....DOWN....UP....DOWN"


I was probably too anal retentive since I sanded the car in between coats. In the grand scheme of things, I didn't need to do this. I could have saved lots of time by painting a few coats before sanding. I used 600 grit for stubborn drips and overlay and a brief 800 grit over the rest of the car for the paint to adhere better. On the final coat, I worked with 800 grit for the large flaws then moved up to 1000 and 1500 for the final sand. If I didn't have any large flaws, I would have gone straight to 1000 grit. After the 1500 grit, I was ready to buff the car. I realize the point of this is to create a smooth surface. Each level of sandpaper takes out more of the scratches to create this surface. Smooth surface = mirror finish.


After the physical sanding, I went to buffing the car with Rubbing Compound using my orbital. The compound takes out medium scratches made from the 1500 grit paper. Polishing Compound followed. By this time, I could see the shine. The more I buffed the more I saw my reflection, the more I saw the fruit of my labor. I finished with a car show shine followed by carnuba wax.


The Verdict:
I am super pleased with the results and surprised by how good it looks. Is it perfect? FAR FROM IT. There are flaws due to my carelessness, and you can see the brush marks if you look close enough. Hey, even ugly people look good from far away. In all seriousness, my roll on job reminds me of a restored factory paint job. At first glance the flaws are hidden and this paint job sure looks ten folds better than it did originally. Knowing that I can grab touch up paint and redo any section provides me peace of mind. I'm so stoked about having Ruby around again. I can't wait to make it look the way I've always wanted to. My CTR front and rear lips are in the process of being painted, and I'll be installing my JDM fog lights soon.


The paint job is such a burden relief. I'm so hyped that I feel like going on a late night cruise right now. WEEEEEEEEEEEEEEEEEEEEEEEEEEEEEEEEE......

Saturday, May 29, 2010

Foot Locker House of Hoop (Daly City)


This past Thursday I was presented with a very unique opportunity for a photo shoot. Nick referred me to a contact of his from Foot Locker, and she contracted me to capture the grand opening for the House of Hoops in Daly City. The event was amazing, and monumental in my growth as a photographer.


Chuy from KMEL and Stephen Curry, runner-up Rookie of the Year, from Golden State Warriors were headlining the opening with a Q&A session. The turn out was great, the staff was helpful, Chuy and Stephen were very humble and approachable guys, and most of all I had fun. For a thorough recap, and to view my pictures, check out these blogs:

Foot Locker Unlocked - House of Hoops in Serramonte Center

Sole Collector Blog- House of Hoops Opens in Daly City


I learned quite a bit crossing into the "for hire" realm. As a hobby, there is hardly any pressure or time constraint, but that gets thrown out the window when a customer is waiting for results. It's a humbling experience that I'm grateful for and I appreciate what professionals have to go through. Needless to say, I'm looking forward to future events like this. Know anyone looking for a photographer?

As with each session, I like to highlight the main learning points. Working under pressure I learned the following,

LESSON OF THE DAY:

1.) A backpack does not work well when you're trying to switch between lenses while smashed by a swarm of sneakerheads. Opt for a small hip pack instead.....or have two cameras :-)

2.) Learn how to program scripts to insert watermarks. Doing this manually is painstakingly long and counterproductive. I wish I could outsource this to Bangalore


Shout out to Nick for looking after my interests and Foot Locker for the golden opportunity.

Wednesday, April 21, 2010

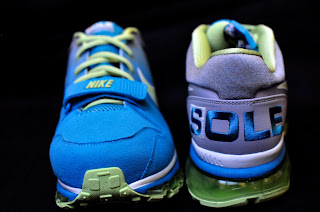
Sole Collector Air Max Trainer 1s

Before kick starting our traditional Gran Prix weekend in Long Beach, Nick and Aaron came down and wanted to take advantage of the strobist kit by shooting shoes. In case you are not familiar with them, they are complete shoe fanatics. It's amazing how much they know about shoes, it's almost scary. There are times when I giggle to myself when they talk about shoes because it's like watching two "Rainman" reciting their vast database. I swear that if a "Stump the Schwab" shoe edition came out, Nick and Aaron would be the Schwabs.

As a side note, they review shoes for a living. Check them out at f5torefresh.com and solecollector.com


So Nick wanted to experiment with lighting and replicate the pictures featured in magazines. Never working with shoes, I figured it'd be a fun experience. We used a single SB-600 shooting into an umbrella and staged the shoes using a spare bed sheet laying around the house. The creases in the bed sheet were too distracting and the colors clashed since they were brown. We then used the black canvas bag from my fold-able poker table. On the camera screen, the images seem mediocre and nothing impressive. However, things changed when we saw them on the computer. The textures from the canvas bag that appeared on preview suddenly disappeared when viewing on a monitor. The pictures came out much better than I expected and I have to say that I'm quite satisfied with the results.


Just to prove my ignorance about shoes, I did not have the slightest clue about them. After throwing them around like a rag doll, Nick schooled me and said those are special edition. Sole Collector and Nike collaborated on the shoes featured and there are only 10 pairs in circulation.


Considering the shoes were laying on a piece of black canvas with texture, I can imagine how much better they'll look sitting on velvet or something silky smooth. One thing we realized from this photo shoot is that we need a soft box. Trying to direct the light via MacGyver style is time consuming and mostly ineffective.


For the last picture (below), Nick started to get creative with using flashlights to highlight the transparent bubble. To light the shoes, Aaron used his nifty iPhone and my Palm Pre.


And of course, no photo shoot is complete without taking pictures of Freddie. The things he'll do for a treat. Silly dog.


Thursday, April 1, 2010

I'll always be a Toys 'R' Us kid

Getting new toys is always fun, but it's much better when the toy is useful. I purchased the 35mm f1.8 lens from Adorama, which is an awesome store by the way, and it is a thing of beauty. As much as I love the 50mm f1.4, I enjoy the flexibility of the 35mm. I no longer have to be an acrobat to take a full frame portrait indoors. The days of hyper extending my arms and neck in a desperate attempt not to cut off someone's head are O-V-E-R.

From Playing with 35mm


Yes, I concur that this post is useless without pics....To test my toy, I opted to shoot one of my favorite subjects, Freddie. I probably have over 500 pics of him already, yet I continue to enjoy snapping away.

"What you lookin' at Willis"
From Playing with 35mm


From Playing with 35mm


Another one of my preferred subject(s)... FOOD PRoN. Kim and I had a few friends over yesterday and we cooked up a nine course meal. More like Kim cooked. I made black bean spareribs and for the very first time...Peking Sparerib. Yes, you heard right, I can make it like the restaurant. Woot! (Pats self on back). Kim's lollipop chicken were delish as always.

Who needs to go to overpriced Sino's when you got Kimbo's
From Playing with 35mm


Catfish claypot.
From Playing with 35mm


From Playing with 35mm

Friday, March 12, 2010

First Shoot with Strobist


There's a sharp learning curve when it comes to shooting with a Strobist kit.


1.) Make sure you have something heavy to weigh down the stand. Even the slightest fart can send the stand flying. Besides a broken umbrella, you can have a broken flash which is a no-no.

2.) Be clandestine... or ask for permission before setting up. Having an umbrella on a stand attracts unwanted attention. A Fire Fighter asked if I had a permit to shoot since we were on private property. Thankfully playing dumb prevailed.

3.) Know how your flash works. I was going for a darker ambient affect while having the flash light my subject. The ambient lighting was too bright after lowering the ISO and shutter, so I had to turn down the F-stop. Well, if I knew what I was doing then I would have known that the effectiveness of the flash decreases as the aperture gets smaller. If I have to crank down the F-stop that much, then it's probably too damn bright outside.

4.) Black colored material soaks the living crud out of a flash. It made such a difference when I asked Nick to turn his hat around.


I started the session trying to light my car with a single flash. That did not work at all and I gave up frustrated. Not wanting to waste the backdrop and time invested setting up, Nick obliged to be my model. It turned out pretty nice. With a little editing magic, the pictures turned out nicer than I expected.

I learned quite a bit during this brief photo shoot and I can't wait until my next venture. I'm so stoked that I can't stop thinking about what and where to shoot.


Props to Nick for being my model, Aaron for being an awesome assistant, and Vince for the recap info.


Wednesday, March 10, 2010

Learning to be Ambidextrous

Vince offered to sell me his 17" MacBook Pro at a stellar deal, so only a fool would pass up such a deal. It's like a car salesman offering you a Porsche GT3 at the price of a Civic or your drug dealer offering a pound of chronic at the price of a dime bag or, or, or...... you get the point.

The model may technically be used, but this puppy is in pristine condition thanks to the immaculate care Vince places in all of his toys. Knowing his almost OCD tendencies in how he handles his belongings (i.e., reading comics via thumb on the seam), I have to admit this blew the record. My laptop came in all OEM packaging with the laptop inserted in the original Styrofoam sheet adhered with the original WARNING TAG!!!!


BUT THAT'S ONLY THE ICING ON THE CAKE...... His meticulousness extended all the way down to the plastic tab cover for the power supply prongs.... ARE YOU SERIOUS!!!!!! All I can say is WOW


This machine is a beast, and I'm looking forward to tapping into it's potential. These pics were edited with Aperture, so I'm off to a good start. However, picking up a new operating system is like trying to learn how to write with your less dominant hand. You'll manage, but it sure looks ugly.

Thanks V!!!

Saturday, February 20, 2010

Playing with the SB-600 Flash

It's been awhile since I've shot with my camera, but I couldn't resist playing around with my new toys. I bought a Strobist setup from some random guy going to a camera show, and I picked up the SB-600 flash from Craigslist. Even though it's only a single kit, there are endless possibilities. Could this be the beginning of an end to natural lighting for me??? I highly doubt it, but at least this setup adds to the repertoire.

Here are a couple pics of my Mom with Freddie sitting outside in the yard about an hour before sunset.


Got a lot to figure out, but at least it's a start. I never even imagine wanting a Strobist kit, let alone an off-body flash.

From Playing with Strobist Kit


From Playing with Strobist Kit